Once upon a time, humans needed to plug their phones into a computer every night to back up their digital lives. It was a savage time full of tangled cords. Today we’ve moved on to cloud backups, allowing us to store a copy of our phone’s information in the cloud. Apple users only have one option when it comes to the cloud, and that’s iCloud. Here’s everything you need to know about how to back up iPhone to iCloud.
Why back up your iPhone to iCloud?
Solid State Drives are a blessing that have helped laptops get faster. But companies, including Apple, have decided to give their entry-level new laptops tiny 128GB SSD hard drives. If you’re traveling, or don’t feel like carrying an external hard drive, backing up a 64GB iPhone can wipeout your storage, so using iCloud is a great option.
Backing up your phone to the cloud also protects you should your phone get lost (which, again, could easily happen while you’re on the road). If you ever lose your phone away from home, you can delete its contents remotely from iCloud and then upload your old phone’s information when you get a new device. Backing up to iCloud just adds an extra layer of protection that’s worth the occasionally annoying price.
What do iCloud plans cost?
Now that the standard iPhone comes with 64GB of storage, the 5GB Apple provides iOS users won’t cut it. The good news is that Apple offers expanded storage plans. Picking the right one depends on your needs. iOS allows users to pick and choose what parts of their phones they wish to backup. For example, if you plug your iPhone into your computer you can automatically set it up to download your new pictures but nothing else.

If all you’re backing up is your Contacts and Mail, you may need less storage than someone who is making a digital copy of their entire phone every night. Currently, Apple offers four paid iCloud storage plans. Since you’re charged month by month, it’s easy to upgrade should you ever find your plan doesn’t meet your needs.
- 5GB: free
- 50GB: $0.99
- 200GB: $2.99
- 2TB: $9.99
Now that you’ve found your ideal storage plan, it’s time to get started backing up your iPhone to iCloud.
How to backup your iPhone to iCloud
1) Connect your iPhone to Wi-Fi
You can’t back up your iPhone using your mobile connection, even if you’re only backing up your contacts. Accordingly, make sure you’re using a private and secure Wi-Fi connection before trying to back up your phone. Even beyond the possible security issues, you don’t want the coffee shop’s iffy wireless cutting out mid-backup. Do this at home.
2) Go to Settings
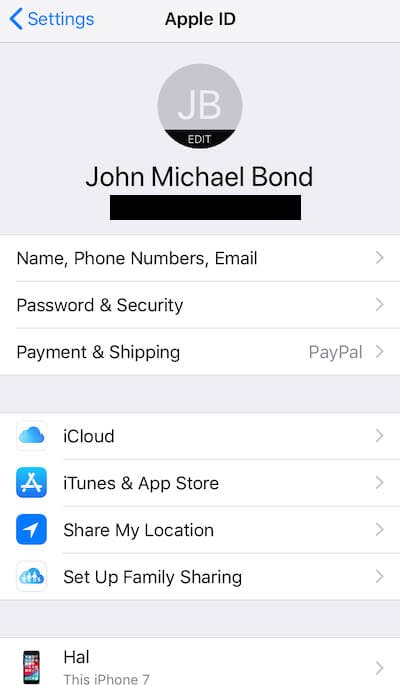
All of your personal user information is in your phone’s Settings menu under your name. By selecting your name you’ll find a menu that allows you to handle your name, email, numbers, password, payments, iTunes, and, yes, iCloud. Keep this in mind next time you need to update personal information.

3) Select iCloud Backup
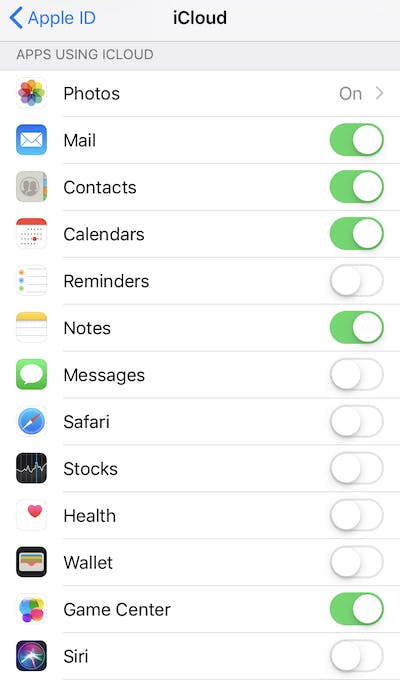
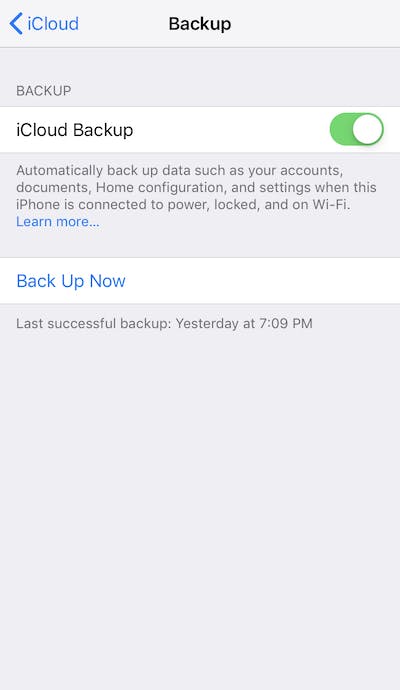
Hit the iCloud option in the menu. You’ll be taken to the iCloud backup page. Select the iCloud Backup button. This turns on automatic backups. As long as your phone is plugged in when you go to bed iOS will do an iCloud backup. Once you’ve turned iCloud Backup on, you’ll be given an options menu that allows you to select which apps you want backed-up each night.

4) Check “Back Up Now”
If it’s been a minute since you last backed up your phone, you may not want to wait until you go to bed. At the bottom of the screen, you’ll see the Back Up Now option. Make sure you’re on Wi-Fi, then select it. Your device will automatically start an iCloud backup. Congratulations! As long as your Wi-Fi is connected when you go to bed, you’ll be covered. And since iOS turns on your Wi-Fi and Bluetooth every night anyway, you don’t even need to remember to set it and it will still back up your iPhone to iCloud.
READ MORE:


